Gas Station Price Sign Survey — Full Guide
Everything you need to label a gas station's price sign accurately. Keep this open in a tab while you work.
1 · What this survey is for
We are studying how U.S. gas stations display fuel prices — in particular whether they advertise a lower cash price, and how that is shown on the sign. Your job is to look at each station in Google Street View and record what its price sign actually shows. Accurate, honest answers matter far more than speed — and your work is paid by accuracy: a set of "gold" stations with known correct answers is mixed invisibly into your batch as quality checks. You won't know which stations are checks, so label every one carefully — careful work pays, random or careless answers don't qualify, and getting a check clearly wrong ends your session.
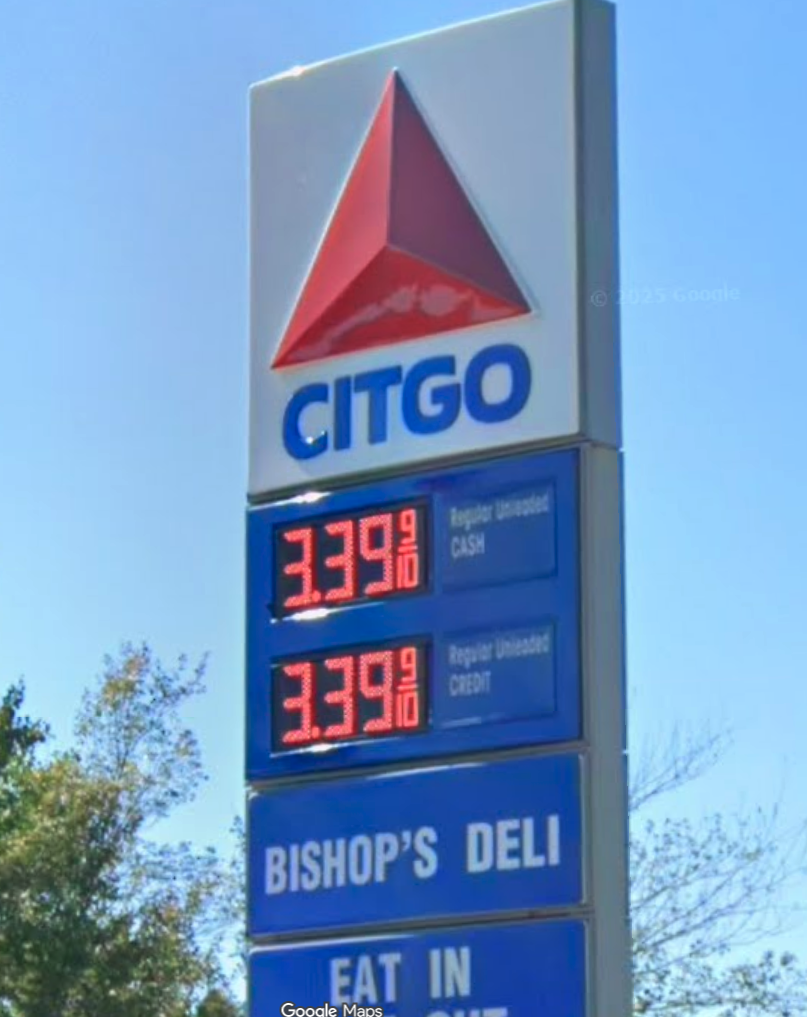
This CITGO sign shows a cash price and a credit price for regular — both 3.39⁹. The numbers match, but the sign still shows two prices. So when the form asks how many prices the main sign shows, choose “two prices, but the same number.” (More in §7.)
2 · The labeling workflow
Every station follows the same short sequence:
- Read the address shown for the station.
- Click Open Street View — a dedicated window opens at that spot.
- Find the gas station and its main roadside price sign, and confirm you are at the right station (see §3).
- Take a screenshot of the Street View and upload it (see §10).
- Work through the four steps of the form — Location → Station → Sign → Price — clicking Next after each. Questions appear only when they are relevant.
- On the final step, click Save & next station.
Your progress is saved automatically. You can close the tab and return later with the same link.
3 · Finding the right station
The pin may not land exactly on the station. Pan and move along the road until you see it. The address shown is the target — the station you must label.
If you still don't see a gas station, search the address on Google before concluding there is none. The pin can be slightly off, and common street names (there are many “Main St”s) can put you on the wrong block — a quick search confirms whether a station is really there.
You must tick the confirmation box stating that the station you're describing is the one at the given address.
4 · The regular grade
You only record the price for the regular grade — ignore midgrade, premium, diesel and the rest entirely.
Regular is the cheapest, most common gasoline. On a sign it is usually labeled Regular, Unleaded, UNL, or 87. If a price on the sign has no grade label next to it, treat that price as regular.
The form simply asks whether the sign labels the grade or you are assuming it, and then for the regular price.
5 · Sign types you'll see
A station can have more than one sign. Use the main roadside pylon sign as your reference; check smaller signs only for extra detail (such as a cash/credit breakdown).

Main vs. secondary. A tall roadside sign plus smaller ones on the building or pumps. Read the main roadside one.

Digital + breakdown. A big digital sign shows one price; a smaller sign splits it into cash vs. credit/debit. Read both.

Cash price bigger. The cash (discounted) price digits are physically larger than the credit price below.

Discount described. The pylon shows one price; the cash discount is written on a separate small sign ("10¢ OFF — pay with cash").

Discount on an LED. "SAVE 10¢ PER GALLON" scrolls across an LED panel rather than appearing as a second price.

Price on the canopy. Sometimes the price digits sit on the canopy fascia or building, not a separate roadside pylon.
6 · Digital, alternating & flickering signs
Many modern signs use digital (LED) digits. Some of them alternate: the same display cycles between the cash price and the credit price every few seconds. Street View captures a single instant, so you might see only one of the two prices.

Same sign, frame 1. The LED is showing one of the two prices right now.

Same sign, frame 2. Step a little forward (or back) in Street View on the same capture date and the LED is showing the OTHER price — that's how you catch both.
In the Street View window, step a little forward and back along the road around the same spot, clicking between adjacent positions. Each click is a slightly different photo taken moments apart — so the alternating sign will show a different price in different positions.
Stay on the same capture date. Street View has imagery from multiple years; only compare photos from the same date (shown as "Image capture: …"). Stepping forward/back normally keeps you on the same date. If the date changes, step back until it matches.
Where to find the date. The "Image capture" label sits in the upper-left corner of the Street View window. On some panoramas it's hidden until you interact — if you don't see it, take one step forward or back and it usually appears.
Old imagery default. Some Street View panoramas open on old imagery (pre-2016) by default. If the date is before 2016, click forward / back along the road to find a newer capture — after 2016-01-01 is preferred when available.
This lets you see both the cash and the credit price, and tells you the sign is "digital alternating". Flickering LED digits behave the same way — move a little to catch a clean frame.
7 · What the form asks you
You don't pick a category. The form asks three short questions about what you actually see on the sign, then guides you through entering the prices:
- Are the prices digital (LED)? Yes or no.
- How many prices for regular does the main price sign show? Pick one:
- One price — a single regular price.
- Two prices, but the same number — the sign has two regular price lines (e.g. a cash price and a credit price) that happen to read the same value right now. This still counts as two prices, not one — see the photo below.
- Two or more different prices — e.g. a cash price next to a higher credit price, or a loyalty price next to a non-discounted one.
Two regular price lines — a cash and a credit price — both reading 3.39⁹. The numbers match, but the sign still shows two prices, so choose "two prices, but the same number." - Is there a separate sign — a banner, an LED scroll, or a small placard — mentioning another price or a discount? E.g. a yellow "CASH 10¢ OFF" placard, or an LED scroll saying "SAVE WITH OUR APP".
If you pick one price and say no to the separate sign — just one price, nothing else — you get one more question: is that single price a discounted price? Some stations post only the discounted price (often the cash price), with the regular / credit price not shown at all, so re-scan for any small "cash" label, banner, or LED note tied to it.
- No — it's just the regular price, no discount anywhere on the property. We save it as a single-price / no-discount case (Category A), which is of special research interest, so we want it to be right.
- Yes — that one price is itself a discount. You then describe the discount (is it for cash? what is it tied to?) just like a multi-price sign, but you only enter the one price that's shown — there's no second price or difference to type.
If you saw two or more prices, or a separate sign, you'll enter the prices themselves (see §8) and tell us what the discount is tied to (cash, debit, loyalty card, app, car wash, or other). (If the two prices were the same number, there's no discount — you'll just enter that one price.)
For analysts — how this maps to the A / B / C codes
Behind the scenes the form maps your answers to research category codes; you don't see or pick them.
A single price per grade, no discount anywhere.
A two-price (cash/credit-style) sign whose prices are currently the same — no discount right now, but of special interest, so recorded separately from A.
Discount tied to cash (or debit). Sub-codes B1–B4 distinguish how the sign shows it (one price / two prices on the main sign / one main price + a separate description / other arrangement).
Discount tied to loyalty card / app / car-wash / other. Sub-codes C1–C3 mirror the B family.
8 · Recording prices (regular only)
Record the price for the regular grade only — ignore midgrade, premium, and diesel entirely.
- Type all the digits you see, including the small
9⁄10 — a sign showing
3.499is entered as3.499. - If you genuinely cannot read the digits, do not guess — mark the sign as "not readable" instead.
When you step forward / back to catch an alternating sign or to find newer imagery, Street View can jump to a different capture date — the "Image capture: …" label in the upper-left changes. The cash price, the credit price, and the screenshot you upload must all come from the same date. If the date changes as you move, step back until it matches before reading the price.
Two prices on the sign? Pick your entry mode.
When a station shows two prices (e.g., a cash price and a credit price), the form lets you record them in one of two ways:
- Both prices — type the cash price and the credit price; the form computes the discount difference for you. No arithmetic.
- Just the difference — type only the discount in dollars per gallon (e.g., 0.10 for a 10¢/gal cash discount). Faster, but you do the subtraction yourself.
You set your default on the "How do you want to enter prices?" screen before labeling starts. Every station's price step has a one-click toggle to switch between modes — flip whichever feels easier for the station in front of you.
Only one price shown, but it's a discount? (You answered "yes, that single price is a discount" back in §7.) Then there's no mode toggle — you simply type that one displayed price. There's no second price or difference to enter.
9 · When something is wrong
Never guess. The form has honest answers for every situation:
- No gas station at this location — there is genuinely no station at the address. Before choosing this, search the address on Google — the map pin can land slightly off, and common street names (there are many “Main St”s) can mislead. If a gas station is anywhere in the immediate Street View vicinity, it is probably the target. Only pick this after checking, and note what is there instead.
- Sign exists but not readable — there is a station and a price sign, but you cannot read it (blurry imagery, blocked by a truck, glare, too far away). Choose this and describe the problem.
- No price sign at all — there is a station but no price sign is visible anywhere.
Even in these cases you must still upload a screenshot of what you saw.
10 · Taking a screenshot
For every station — including ones with no station or no readable sign — take a screenshot of the Street View and upload it. This keeps the dataset honest and lets us double-check tricky calls.
Fastest: copy to the clipboard, then paste here.
- Mac: press ⌃+⌘+⇧+4 and drag a box around the Street View — that copies it to your clipboard. Then press ⌘+V anywhere on the survey page to attach it. (Plain ⇧+⌘+4 instead saves it to your desktop to drag in.)
- Windows: press ⊞ Win+Shift+S, drag a box, then press Ctrl+V on the survey page to attach it.
You can also drag a saved image into the screenshot box, or click the box to choose a file. Try to capture the price sign and, if possible, the "Image capture" date.
11 · Rules & quality
- Your work is paid by accuracy. A small set of "gold" stations with known correct answers is mixed invisibly into your batch as quality checks — you won't know which ones. Careful, accurate work pays; random or careless answers don't qualify, and getting a check clearly wrong ends your session.
- Answer every question yourself. Nothing is pre-filled and no option is pre-selected.
- Type in the names — the gas station name and the convenience-store name, exactly as shown.
- Record the price for the regular grade only.
- Verify the address when stations are close together.
- Screenshot every station.
- Never guess — use "not readable" / "no station" instead.
- Be accurate. Rushed, careless work is easy to spot and is not useful.
12 · FAQ
I can't find the image-capture year / date.
The "Image capture: …" label sits in the upper-left corner of the Street View window. On some panoramas it's hidden until you interact — take one step forward or back and it should appear.
How exactly am I paid?
By accuracy. A set of "gold" stations with known correct answers is mixed invisibly into your batch as quality checks — you won't be told which stations they are or where, only that they're there, so label every station carefully. Your accuracy on those checks determines whether your work qualifies; getting one clearly wrong ends your session. Random or careless answers don't qualify — accuracy is what counts.
Can I switch the price-entry mode partway through?
Yes — every station's price step has a one-click toggle to switch between "both prices" and "just the difference." Your upfront pick just sets the default; flip whenever it feels easier for the station in front of you.
The Street View image is old — is that OK?
Yes. Record the approximate capture date from the "Image capture" label. Old imagery is still useful; just note the date.
The station changed brand between photos.
Label what the sign shows in the imagery you used, and mention the change in Notes.
I can see the sign but not the small ⁹⁄₁₀ digit.
Enter the digits you can read. If you can read the main price but not the fraction, that's fine — note it.
There are two prices but no "cash"/"credit" label.
That happens. Pick the closest grouping option and explain in Notes. The bigger or more prominent price is usually the cash price.
I made a mistake on a previous station.
Click its number in the strip at the bottom-left to go back and re-save it.
← Back to the survey